what to do when your moen kitchen faucet handle is loose
When you're using a single handle kitchen faucet and you're using it for a long time now, chances are your faucet will get loosened over fourth dimension and utilise. Faucet is that kind of accessory that we use every day, hither and there. They provide you lot with water and you live freely.
When it comes to tightening your loosened kitchen faucet, you lot'll think of calling your plumber every bit the job is a bit difficult to bargain with. But why don't you yourself give it a attempt?
When it's the matter with water, in that location are your supply lines involved with it. That'southward a flake messy indeed and of course, plumbing is a great option. Just if you think about tightening the faucet, we think you should requite it a get!
Loosened faucets crave firsthand tightening as information technology's involved with h2o. Or else, y'all might face a dripping problem. Your faucet can lose some of its parts as well if you don't tighten it at the correct time.
In this article, we're going to show you how to tighten a loose Moen single-handle kitchen faucet. What are the steps for it and what tools you need to perform the chore properly?
Tools required
There are basically two types of issues in common. Your faucet base of operations gets loosened over time as the water passes through it and it has to handle the pressure of water. The other affair is the handle. The handle gets loosened over-usage. Each time you turn the handle to plow the water flow on, it gets a bit loosened. Now, to tighten the faucet base and the handle, you need to follow a few steps. For this reason, our commodity will be divided into ii parts. And the tools you need to perform this are:
How to tighten the base of operations of a Moen kitchen faucet?

A loosened base can be a real headache to you when it comes to kitchen faucets. Faucets demand to move freely in order to give you the smoothness of water flow and other household works. But when it's moving too much, it can cause h2o leakage or baste and that'due south pretty embarrassing.
You can easily get rid of that issue one time y'all tighten the base of your kitchen faucet. At present, the big question is, what are the steps of tightening a kitchen faucet base?
In this section, we'll try to share the steps of tightening the basement and what you demand to follow when you're intending to tightening the base of your kitchen faucet.
This one is non a step. Basically, it's a precaution for your process. When yous're willing to tighten the base of your kitchen faucet, you'll be dealing with pocket-size particles and objects. This procedure is pretty important considering if 1 of your faucet parts gets lost fifty-fifty if it'due south smaller, you might non exist able to find the exact one.
So, encompass the bleed hole first so that whatsoever part doesn't go through the drain. When the precaution role is washed, y'all can movement forward to the next step.
Before y'all start the process of tightening the basement, you need to turn off the water supply lines. There are two types of h2o supply lines for both cold and hot water supply. Yous need to turn both of them off before you start.
Get under your sink and you'll be able to find out the 2 valves. Turn them counterclockwise to turn the water supply lines off. Make sure yous've done information technology properly. When information technology'south done, drain the water remaining in the line.
When you piece of work with tools and things in your kitchen, you might kept your things in the sink. It'south essential that you clear your sink first in lodge to motility to the next step.
If you don't, they can be your obstacle while you're tightening the base of operations. So, it'southward essential that you clear your kitchen sink pretty well.
Earlier moving to the next footstep, you take to make sure that your faucet is gratis from all kinds of pressures. When you turned off the supply lines, water may requite pressure level to your faucet and when your faucet is pressurized, you can't work with it smoothly. Then, information technology's essential to release all kinds of pressure from your kitchen faucet.
So, turn on the water on the handle to release air and h2o pressure immediately subsequently you turned off the supply lines in gild to move to the next step.
When everything is done perfectly and smoothly, you need to pry off the water lines. Concord an adaptable wrench and fix it in the center of h2o supply lines and the intel. Now, motility the wrench counterclockwise to pry off the h2o lines. This will give your basement tightening some other speed.
Now, information technology'southward time to tighten the nuts and screws of your faucet base that holds the faucet together. Check out the grip of the basement if it'southward okay. Concur the loosened nuts with your regular wrench and turn them clockwise to tighten. When you lot're tightening, yous have to make sure that you're not giving too much pressure on the nuts.
To tighten the nuts in between the faucet and the base, you need a basin wrench that comes upwardly with attacking jaws. Information technology'll make your tightening easier and comfortable.
When you've finished tightening the faucet base of operations, it's time to bank check out your progress and tightening. If everything is okay, so turn the h2o supplies on. When water is coming clearly, plow the faucet on and bank check if at that place's any leakage issue or dripping issue.
Uncover your sink drainage before turning the h2o on. If there's no leakage and your faucet moving and operating smoothly, then you're done tightening your faucet base. If yous find out that in that location'southward still some dripping issue, you lot need the basin wrench to tighten a little more.
How to tighten the handle of the Moen kitchen faucet?
When yous use your kitchen faucet regularly, there are chances that your faucet handle is getting loosened over time and usage. When your faucet handle gets loosened, yous need to fix information technology as soon as possible. Otherwise, bigger bug may occur. A loosened faucet handle is harmful and for this, yous may discover water leakage.
And then, the question is, how to tighten a moen kitchen faucet handle in order to make it like new? In this section, nosotros'll try to cover the steps of tightening your moen kitchen faucet handle. We'll go step by step to make your faucet handle tightening easier.
Remove everything from your kitchen sink. When you're tightening the handle of your kitchen faucet, that's a catchy job to deal with and y'all're dealing with small particles. So, You demand to articulate the sink in order to work smoothly.
Besides clearing, make certain y'all blocked the drain system of your sink to prevent small parts from washing away.
There are two water supply lines under your sink they provide hot and cold water. Y'all need to plow them off before you lot movement to the procedure of tightening.
Turn off the water supply lines by moving them counterclockwise. It'south essential to plough them off.
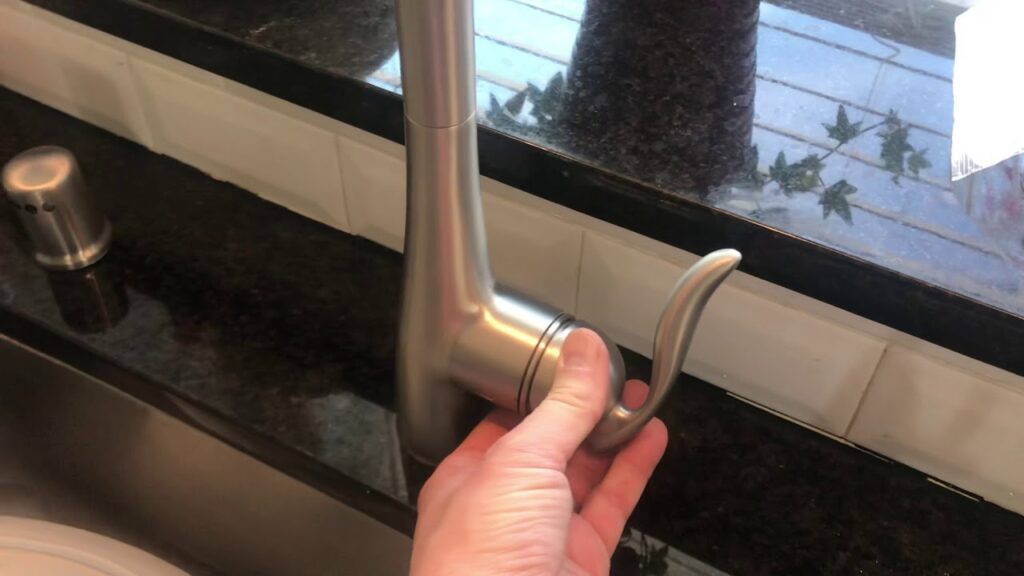
In society to fix the handle, yous demand to study the handle commencement. Check the proper mechanism of your kitchen faucet and the handle to get the verbal machinery and how it works. When y'all're dealing with a moen kitchen faucet, you can observe two things in the handle.
There's a hex spiral or nut at the entrance of the kitchen faucet handle. You lot demand to take a wait carefully. On the meridian of your faucet's handle, you tin can find a cap.
Removing the hex screw or nut is tough and tricky. You have to be very careful or you can impairment your faucet. Both of the hex nuts or screws are smaller than other nuts. When you're removing them, use a mini knife to help y'all.
The removing process may crave a few minutes or a minute. But you lot have to be very careful as you're dealing with the knife. Don't impairment other parts and finishes.
At present, y'all have to find out the setscrew that's within the faucet handle cap. Reaching it is a flake tough and catchy. Whatsoever kind of tools tin't reach in that location. You need to detect information technology out carefully as it'due south under the decorative cap.
Now, take a 3/32 sized Allen wrench to assist yous out. This wrench is designed to work with tough corners. Information technology's platonic for the faucet handle and it can make your work pretty easier. In most cases, this is the accurate size for tightening the screw inside the handle.
When you have the perfect-sized Allen wrench reach in that location and locate the setscrew. The reaching is all nearly feeling. You lot can feel information technology when y'all get there. If you don't, try from different angles and unlike perspectives.
The hardest task is finding the setscrew. In one case you plant information technology, your work is almost done at that place. Tighten information technology with the wrench. Hold your screw with the Allen key.
Now, use a wrench to tighten information technology. To tighten the screw, you need to move the wrench clockwise. Don't give too much pressure while you're tightening. Screws inside the faucet handle are pretty sensitive. So, you have to be very conscientious when you're tightening the screw of the handle.
When the tightening is done and everything is completed, you can exam the handle at present. Attach the water supply lines that are located under the sink. Now, you lot have to check the tightness of your kitchen faucet handle. Brand sure it's comfortable.
If you experience similar your faucet handle is non comfortable all the same and it's leaking still, you need to go through that procedure in one case again.
The process is not likewise difficult. Past post-obit these basic steps, you can easily tighten your moen kitchen faucet handle.
A few tips for the tasks
Conclusion
So, this is how you can tighten your loose moen unmarried handle kitchen faucet. The processes are the super like shooting fish in a barrel and DIY type. Ever use the right gear to perform the action and when you're doing something with water, make sure y'all practise information technology advisedly.
In this article, nosotros've tried to cover how you can tighten your loose Moen unmarried-handle kitchen faucet. hopefully, this article volition help you to sympathize everything and your problems will be solved. If you take whatever questions or queries, feel free to leave a annotate here or contact us straight. Visit our website for more helpful articles like this i.
cranswicklizeatied.blogspot.com
Source: https://www.kitchenfaucetblog.com/tighten-a-loose-moen-single-handle-kitchen-faucet/